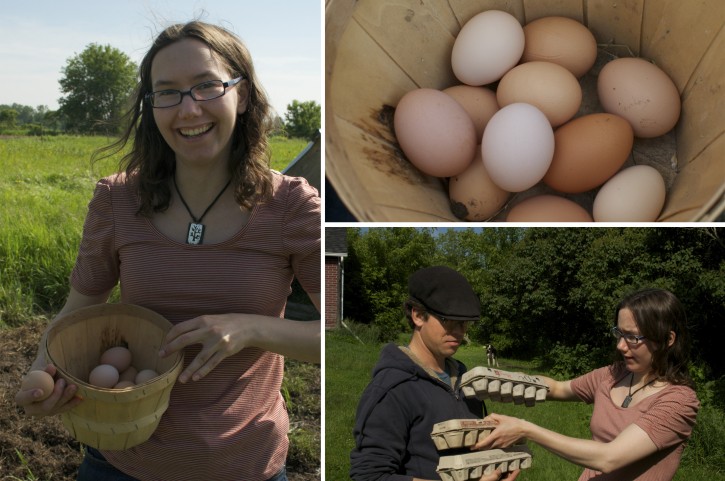
Posts Tagged ‘organic’

Dandelion Wine, Dandelion Wine, when I finally get some I think it will be fine!

Wednesday, May 16th, 2012

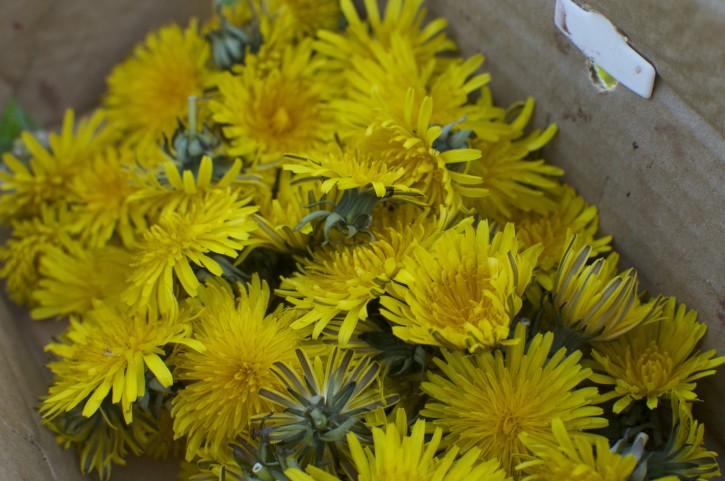
Getting to know the farm is really wonderful.  Each time we go, we experience the seasons in a new way.  While dandelions are generally considered delightful in my family, the farm in full fledged May dandelion glory is really something else.

Rebecca started picking them as soon as she was out of the car and I started thinking about what we could make with such an abundant supply of foraged food.

A quick internet search lead me to dandelion wine and off we went.  We had an easy project that would fulfil my foraging and homebrewing-while-pregnant urges for the season. I think we’ll save Sarah’s dandelion jelly for next year.

We picked a gazillion dandelion heads right before leaving and  then we took them back to the city to complete the job.  While Becca was at nursery school the next morning, I quickly separated the petals from the bitter green bits with the kitchen scissors.  It took about an hour and stained my fingers.  Next I poured boiling water over them in the crock and then covered it up and walked away for 3 days.

After adding lemons, oranges and honey to the mix, a steady 30 minute boil finished it off. A quick strain in to the carboy, some yeast, and an airlock and that’s it.  For real measurements and quantities see the MotherEarthNews Article, I just followed their instructions since their cider information was so helpful. Unfortunately we got carried away and forgot to take a specific gravity reading so we may very well be making some sort of mead-like moonshine. We’ll let you know this winter.

Easy Instructions to Grow Organic Potatoes in Containers

Saturday, February 11th, 2012

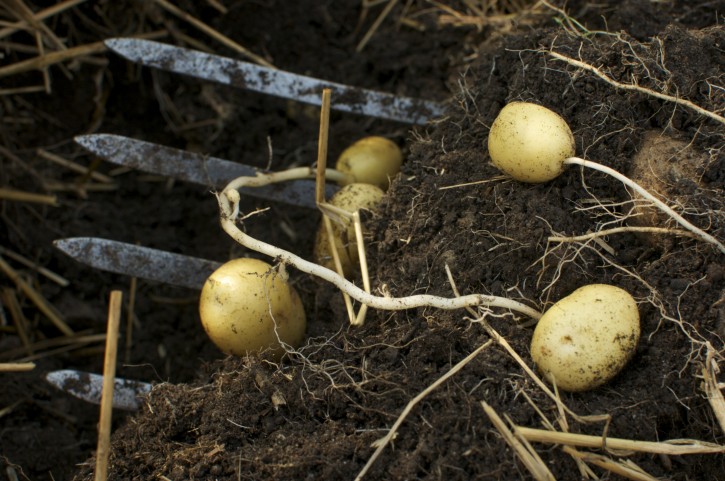
I’ve talked about growing potatoes here before and recently was invited to write about the topic for Kaia magazine.  It’s the first time I’ve had anything I’ve written published in print so check out pages 40-43 as well as the other excellent gardening and eco-friendly articles.

Last year’s potato post was the most popular post ever but this article has clearer instructions than the ones I’ve published before. Planting is still a few weeks off here, but I’ve just placed a giant order with Eagle Creek Farms that we’ll plant here in the city in the garden bathtub and up at the farm this summer as well.  This year we’ll be growing a variety of different coloured and shaped potatoes as well as early, mid and late season varieties and I hope you’ll join me in growing spuds this spring.

Potatoes are not the first thing that comes to mind for most people when they think of container gardening but they really are the perfect candidate. Potatoes love growing vertically, can take up a great deal of space, and are susceptible to pests and soil contaminates. Simply planting them in a container rather than your garden beds helps maximize your yield while reducing potential problems.

Potatoes are really so easy and satisfying to grow that you’ll wonder why you didn’t start sooner.


1. Pick and Prepare a Container

Almost any vessel will do with the criteria being: well draining, non-toxic, with a preference for a tall rather than squat shape.

In our own garden we have tried a variety of containers.

For years we grew them in an old garbage can with extra holes drilled into the bottom, food grade buckets again with added holes, large terra cotta pots, repurposed wooden crates, in grow bags, and my favorite, an antique claw footbath tub with a layer of stones and brick at the bottom to ensure adequate drainage.

Once you have chosen your container give it a good scrub and add any extra holes it needs, as adequate drainage is probably the most important factor in a healthy harvest.

 2. Choose Seed Potatoes

The best part about growing your potatoes is the variety you can choose from. Potatoes come in a spectrum of colors including yellow, red, purple and blue and many different shapes such as fingerlings.

You may be able to find seed potatoes at your local nursery, gardening event, or organic co-op. It’s also very easy to order them online and some great sources of seed potato are listed at the end of this article.

If you’d rather just use potatoes from the grocery store you can with a few specifications. These tubers should be organic, as some grocery store potatoes have been treated so they won’t grow eyes. Look for potatoes that are showing signs of sprouting and chose new potatoes over ones from last fall that have been treated for long-term storage. Gently wash them; being careful not to scrub off those eyes, as that’s where the shoots are going to grow.

This year our selections include Russian Blue, Rose Finn Apple Fingerlings, Alaska Sweetheart and a bag of organic red potatoes that sprouted by accident.

3. Cut & Cure

Once you have your potatoes you’ll need to chit them, which is just getting them to sprout eyes. Putting them in a paper bag or egg carton for a few days should do the trick.

Potatoes can be planted whole or cut up. It’s a matter of personal preference.  I cut mine in half. Make sure there is at least one eye per piece and then leave them in a dark spot for the cut to heal over night.

4. Plant

Start by filling your container with just a few inches of soil and compost and place your potato pieces on top of the soil. Loosely cover them with another 6 inches of soil and then water.

Potatoes need at least 6 hours of sun per day and will thrive with more. I have normally tucked them away somewhere sort of cool and find they fill a less than perfect corner of the garden.

Potatoes are excellent companion plants to beans, cabbage and corn and are better off growing quite a distance from sunflowers, tomatoes, raspberries and squash.

5. Water & Add More Soil

As they grow, loosely add more soil around the plants. For every 6 inches or growth or every two weeks add a shovel full or so.

Be sure to keep the soil moist and not to allow the soil to dry out.


6. Harvest

After anywhere from 2-4 months, depending if you planted an early, mid or late season variety the leaves will turn brown and die. Nothing’s wrong, this is how you know its time to harvest! Use your hands if possible or a pitchfork. A trowel can really wreck the tender new potatoes, cutting into their skins. Feel free to dump the entire pot over on the patio.

Planting, growing and harvesting potatoes are all excellent activities for kids. It’s really hard to mess it up and digging for them at the end of the season is like a little treasury hunt making a great activity to show where our food comes from.

7. Eat!

Everyone loves potatoes, especially fresh from the garden. We especially like them on pizza with leeks; they’re excellent in soup, as a simple side dish or in a perfect summer potato salad.

So there you have it: a quick and dirty way to put delicious organic produce from the garden on your family’s table.


Pressing Apples and Pitching Yeast; the Hard Cider is Bubbling

Tuesday, October 25th, 2011
One night back in August, our good friend Devin came over for dinner and a few drinks. We were probably talking about the barn or some other happiness and he must have forgotten who he was talking to, as he said he’d really like to make some hard cider some day.  
Well, I am incredibly impulsive and Ryan is a very good sport. So while Devin was still talking cider, I was online researching, being egged on by Well Preserved, firing off emails to arrange to go apple picking at the farm and had found a press on craigslist that we drove to pick up two nights later. Phew.

So jump ahead a month from our lovely and impulsive drive to Keswick, Ontario. We bought our amazing press from an Italian wine maker with a killer vegetable garden and now we’re at the farm.  Sigh.  The farm and its amazing apple trees that are having an amazing season in Prince Edward County.  Sigh.


We came home with 8 bushels of apples.  Home to Toronto, the racoon capital of the world. We stored the apples out on the deck so they would benefit from the cold temperature at night.  Every morning I woke up and opened 8 giant rubbermaid tubs of apples and every night I tried to remember to close them back up. Hilarity, with much broom shaking at racoons and squirrels.

Two days before cider pressing day, piles of gorgeous crab apples showed up from our old Leslieville dog park friend Susan.

Then the organic cranberries went on sale post Thanksgiving. So I bought 8 pounds.  Now we’re on to something.

So on a nice chilly Thursday morning in October, while the neighbours were all at work, Devin, Ryan, and I ate some apple crisp, set up the camera (we did all meet in film class) and started cutting apples.

So many apples.  6 bushels went towards cider, so 250 pounds in all.

Honestly, we didn’t have a clue what we were are doing despite two months of research now and a bad test run in September. 


After a ton of trouble shooting, we have the first real flow of cider!

drip, drop.

It’s pink!


It flows!

Most importantly, it’s freakin’ fantastic!

We had a hard time for the first little bit.  We needed to chop things much finer than we had thought. Next year we’ll build a grinder contraption. My poor poor food processor.  At least we had help.

Another mistake I made was that I had froze some chopped apples to protect them from the beasts.  The cold is supposed to help with the taste but they really needed to thaw before we pressed them,  Frozen apples turn into hard masses that are colder than the universe when you press them. It’s dreadful.


After some trouble shooting we finally hit on a combination of cheese cloth, pressure, non napping toddler, and unfrozen apples that led to beautiful flowing cider.

And a good time was had by all!


So after a taste, it all went in my grandfather’s carboy along with some camden tablets.  Two days later we added a champagne yeast starter and things are bubbling away happily.

The idea that started in August, led to a bunch of fun in September, is well on it’s way to fruition in October, for bottling in November, to hopefully drink and share in December. All because Devin wanted some cider.

We’ll be writing a little more about our actual process and organic / non GMO home brewing in the next few weeks but in the meantime here’s an another time lapse:  


This 3 minute video covers 8 hours of apples.  My favourite part is the oozing of apples from the first press (this should not have happened). Others like how the toddler keeps getting more clothes, how the dog is eating way too many apples and how we clearly stopped to eat lunch and dinner. What’s your favourite part?  And is there anything you want to know?

Make Your Own Organic Cranberry Sauce {Enough for both Canadian Thanksgiving and Christmas}

Saturday, October 8th, 2011

I had a lovely evening out last week with my friend Shana.  We went out on the town to a canning class put on by Bernardin in a local church kitchen. Although we’re both becoming rather seasoned canners it’s nice: 

1. To have a nice community event to go to.
2. We kind of like hanging out in church basements.
3. We need to start having real answers when we get asked questions about canning instead of having to admit to some of our bad practices and mishaps (see here, and here for details).

One of the recipes shared by Chef Emerie was for Spiced Cranberry Preserves.  The process is the same as this recipe for cranberry sauce off the rather useful home canning website.  The only difference is that this method uses 1/2 teaspoon of ground cloves and 1/2 teaspoon of ground cinnamon so no need for cheese cloth. I actually used a 1/4 teaspoon of each. There’s also a good recipe for straight up cranberry sauce which is basically just a larger amount without the spices.  

This is so simple.  Thanksgiving and Christmas Cranberries are essentially just jam so you really can’t go wrong. 

The high pectin content of cranberries really makes this simple though; 10 minutes and you’re set.  Get it? Set?  That’s a jam joke. Really though, I had completely finished this project in one toddler nap and even had time to call my dad and a clean kitchen when she woke up.

I made this recipe twice; once with the spices and one without.  I think they are equally delicious but we’ll be putting them to a taste test on Sunday at Thanksgiving dinner.

So the recipe is: 

4 cups of fresh cranberries {but frozen would work fine too}
1 1/2 cups of water
2 cups of sugar

1/4 teaspoon of cinnamon {optional}
1/4 teaspoon of cloves {optional}

makes 4x 250ml jars

Our version is entirely organic. The Big Carrot and Better Bulk {both on the Danforth in Toronto} have  awesome organic spice sections and it is getting easier and easier to find organic ingredients at the grocery store.

I wish I could have found Ontario Cranberries today as they certainly grow pretty close to home, but it seems there are only three commercial cranberry producers in Ontario. The store had frozen and organic from BC, Some from Maine, and then the f
resh organic Quebec ones I ended up choosing. I’m going to keep my eye out at the farmer’s market this weekend as I have a few more cranberry recipes I need to make and the foodies & farmers of twitter tell me there are smaller scale cranberry growers to look for.

Let’s can some cranberries while there’s still enough time to do this for Thanksgiving dinner this weekend:

Prepare your jars and lids by washing and bringing your jars to a boil and in a separate pot bringing your lids to a simmer.

In your best non-reactive pot, combine all your ingredients over medium heat.

Cook for 10 minutes or so.  You’ll see / hear the cranberries burst / split / explode. Here’s a photo of them splitting. They really pop.

I then squished a few up with the back of my spoon just to mix things up a little.

Quickly jar up the preserves with a 1/4inch head room, wipe the rims, put on your warm lids, screw finger tight and then heat process for 10 minutes.  That’s it! You’re done and the star of Thanksgiving dinner with some extra to bring again at Christmas; Ensuring that you remain your parent’s favourite daughter.

All kidding aside, I’m really pleased with how these turned out and would recommend making some both to the seasoned canner and the tenderfoot who is looking for an easy to make preserve that will certainly be well received.

If you would like detailed step by step canning instructions just check out www.homecanning.com.  I really couldn’t lay it out any better and there are even instructional videos.

A Mostly Organic all Handmade Birthday Party for Rebecca

Friday, August 12th, 2011

Rebecca’s 2nd birthday was a smashing success, with splashing, swimming, bubbles and some pretty good food if I do so say so myself.

This is just a quick post to share our simple menu and a few cute photos that I couldn’t resist posting. For our guests, I’ll be sending you the photos of your families in the next few days since I can no longer keep track of who loves having their pictures here, who simply tolerates it and who’s husbands can’t stand it.

An old bed sheet and some daylilies with mint from the garden in your mother’s old vases can do wonders for your porch. Ryan and I made the bunting together last year for her first birthday, We sewed at night, out on the deck in the Toronto summer heat so we didn’t wake her up. 

By using the chalk board as a menu/back drop/cover up for our unfinished reno we were able to accommodate a variety of food restrictions, allergies and vegans. Lots of vegans. 


When we were on a strict elimination diet I would have loved to have gone to a party or picnic where 1st of all Rebecca and could eat something. Its really truly dreadful to go somewhere and not have anything to eat and 2nd to have not had to spend the whole time trying to figure out what I could possible eat.  So we simply kept the menu vegetarian and labeled all the foods based on their vegan/gluten free/soy free/nut free status. I even got to draw cute pictures of carrots.

Salad #1 Our Yogurt Dill Curry Mustard Potato Salad. Not Vegan, but delicious. Also clearly labeled as such.

Salad #2 Peas + Zucchini + Dill + Olive Oil & Lemon Juice is pretty much the best thing in the world. Add Feta if you’d like.  This one was gone in ten minutes.


Salad #3 Carrot Slaw! Delicious.  The recipe calls also for feta, but really its not hard to serve it separately and have all your guests be able to eat.

Salad #4 Quinoa & Chickpeas with beets garlic and mint. Cook your Quinoa, then add chickpeas, then saute with garlic and mint.  Add cooked beets. Voila. Babies love Quinoa.

Last but not least, Salad #5.  Having a large number of nursing mothers in attendance I thought it was only fair to serve up the fennel salad from this post.  Keeping seasonal, we switched the fiddleheads for mushrooms.

 Then 6 toddlers and babies jumped in the pool in their best clothes and giant water-loged cloth diapers.  They all had their bathing suits with them but didn’t give any warning what so ever.

After an outfit change into her pinafore from the lovely bohdi handmade on etsy we had 100% organic Angel Food Cake from my grandmother’s Joy of Cooking. Served with whipped cream, cottage-made jam and perfect Ontario Peaches. We also had some fruit salad and peaches for those who needed an alternative.

 Then there was some of this followed by another toddler wading pool party.

Then some of this. What good little monkeys.  A good time was had by all.